
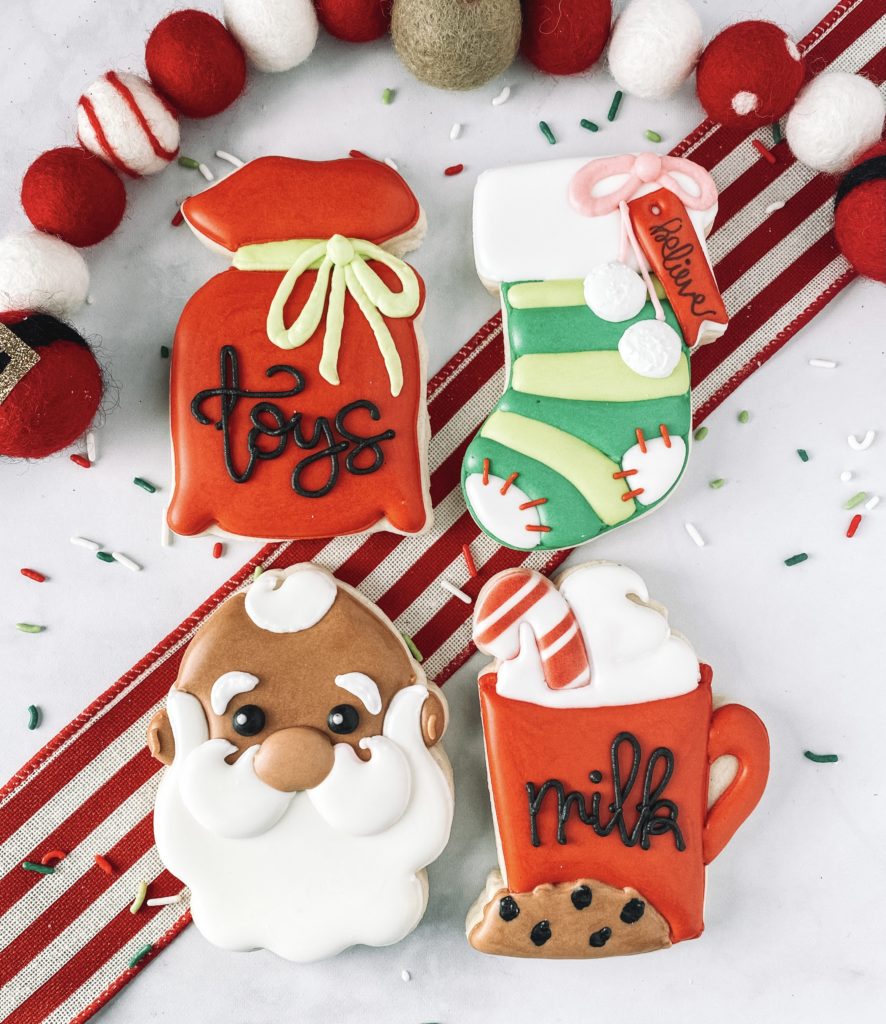
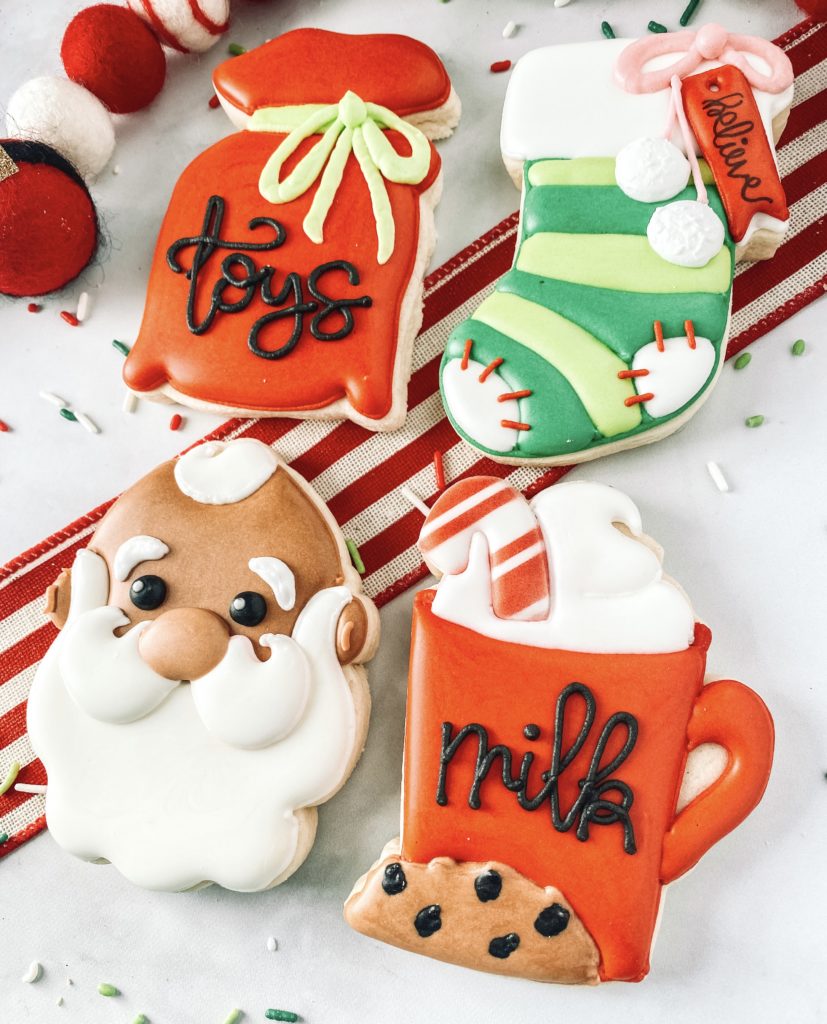
It’s almost time to get the cookies and milk out for Santa! I love to get this set made for Santa plate on Christmas Eve, and this is a popular set for selling so others can use them for that as well. A cute stocking, a bag of presents, a mug of milk with a cookie, and a cute little hatless Santa. What more could you need to put out for Santa?
I will walk you through all the steps and the colors you need to make this cute set of Christmas Cookies.
YOU WILL NEED:
Cut-out sugar cookie dough
Royal icing
Icing colors – I use Americolor brand or Cookie Countess Brands
TOOLS AND TIPS:
Tips #2 or #2.5
Couplers
Icing bags
Parchment paper
Cookie sheet
Toothpick or scribe
CUTTERS: SANTA, TOY BAG, STOCKING AND MILK MUG FROM THE SWEET DESIGNS SHOPPE
COLORS YOU WILL NEED:
White – outline and flood
Mint/lime green – outline and flood
Black – outline icing
Brown – outline and flood icing
Red – outline and flood icing
Pink – outline only
Leaf Green – outline and flood
Optional:
Black edible marker
Red airbrush color – Cookie Countess
Candy Cane Stencil – Cookie Countess
Cookie Countess Airbrush machine
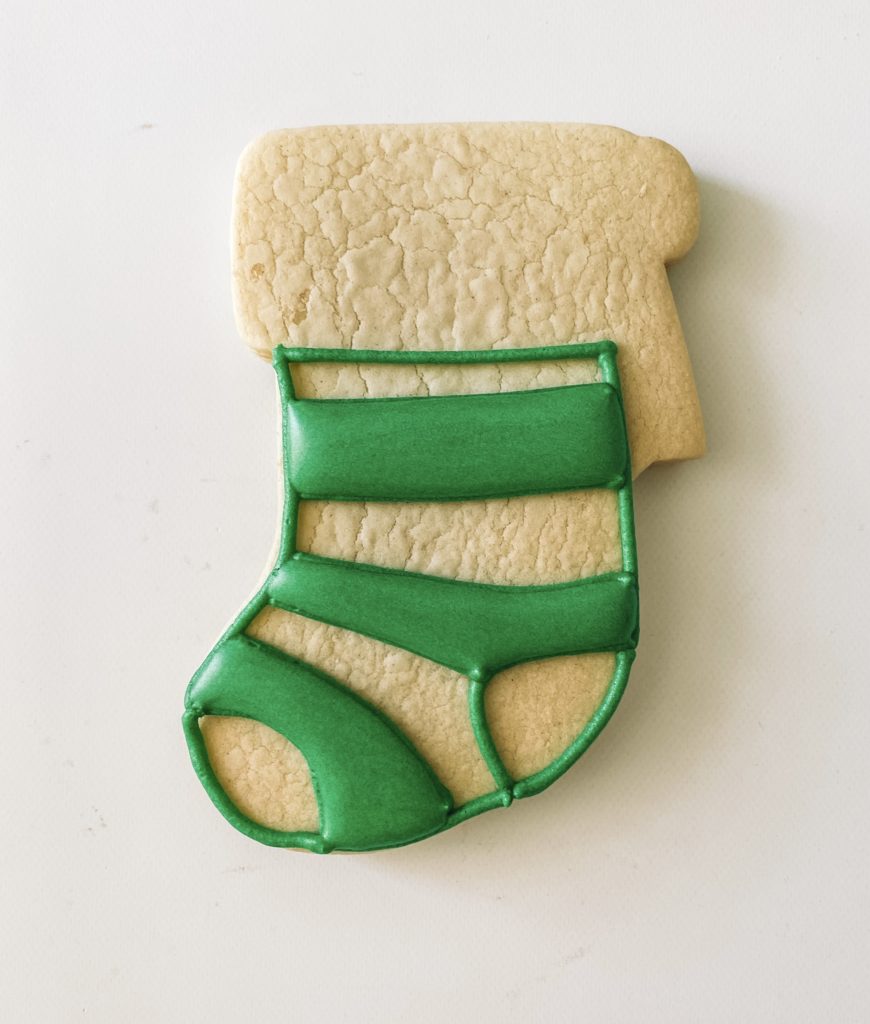
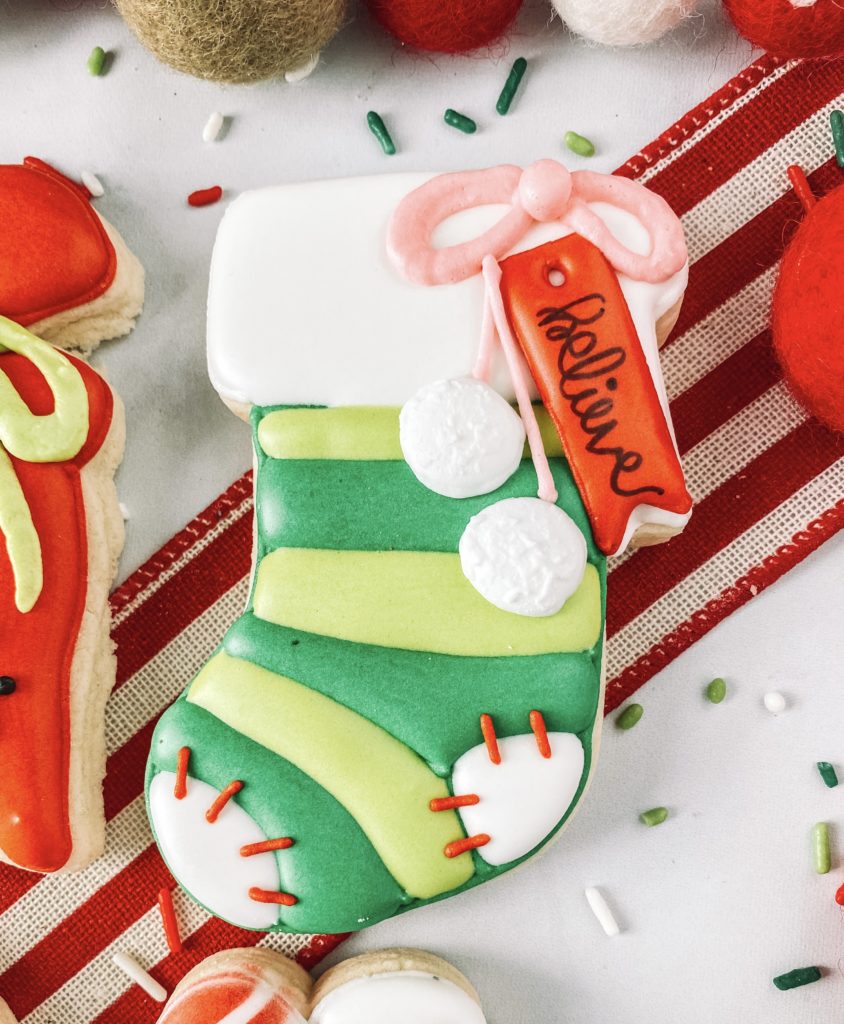
CHRISTMAS STOCKING
OUTLINE and FLOODING
Step 1: Outline the bottom half of the stocking then outline the lines for the darker green, the heel, and the toe with leaf green piping icing.
Step 2: Fill in every other section with leaf green flood icing.
Stop and allow your cookie to dry in front of a fan for 1-2 hours before flooding the next section.

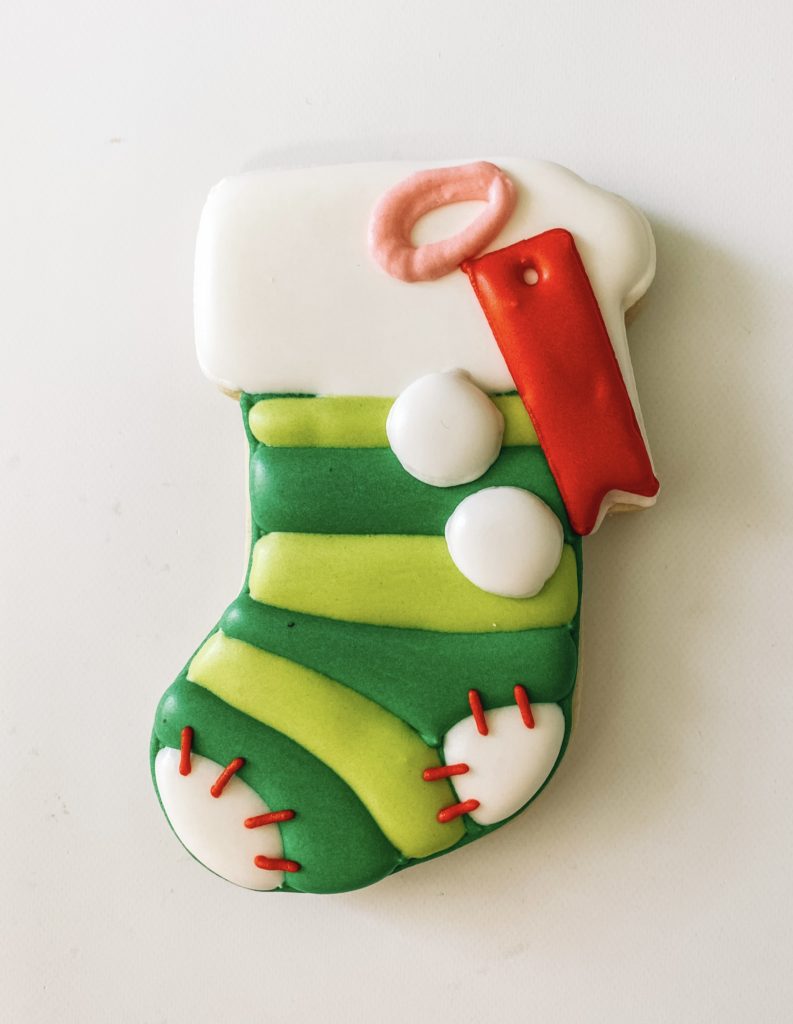
Step 3: Outline the top of the stocking with white piping icing.
Step 4: Fill in the top section, heel and toe with white flood icing.
DETAIL
Step 5: Using red piping icing outline the tag for the stocking and fill it with red flood icing. With red piping, icing add the “stitching” to the toe and the heel of the stocking. Add one loop of the bow with pink piping icing and two small circles with white piping icing for the pom poms on the stocking.
Stop and allow your cookie to dry in front of a fan for 3-4 hours before flooding the next section.
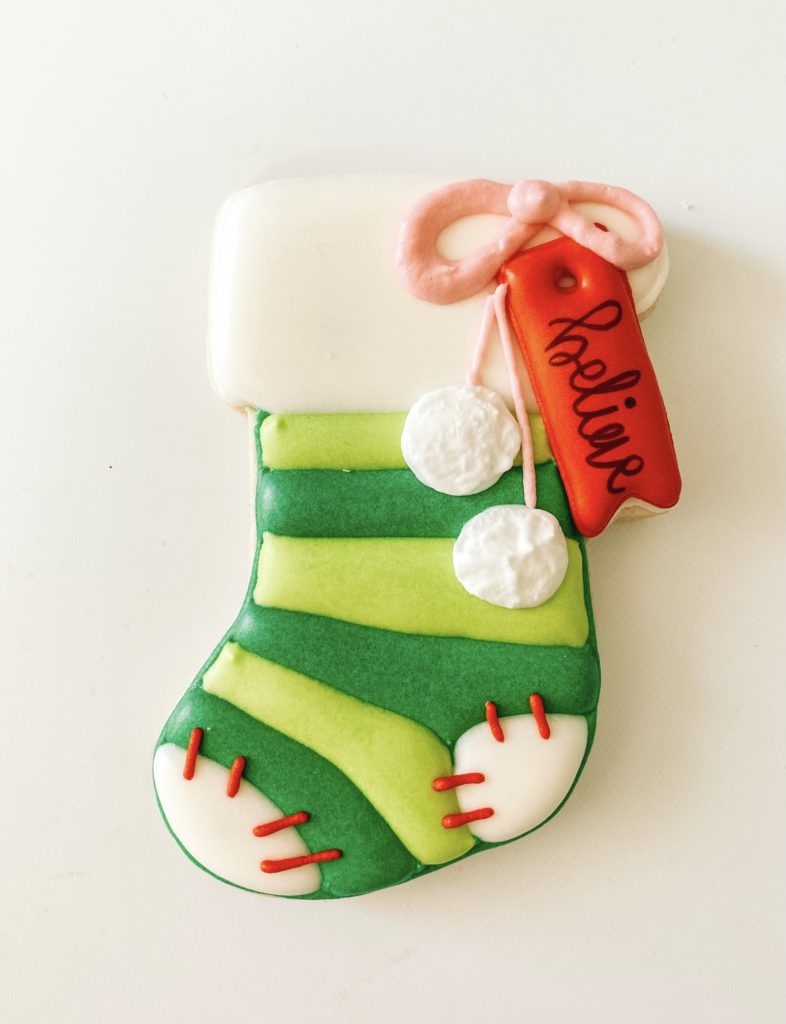
Step 6: Complete the other loop of the bow with pink outline icing. Using a black edible marker write “believe” on the red tag. Pipe a little white piping icing on the two white dots then immediately use a paintbrush to dab creating a fluffy pom pom. Add a dot in the middle of the bow with pink piping icing.
TOY BAG COOKIE
OUTLINE and FLOODING
Step 1: Outline the toy bag in two sections with red piping icing.
Step 2: Fill the outline using red flood icing.
Stop and allow your cookie to dry in front of a fan for 1-2 hours before moving on to the details.
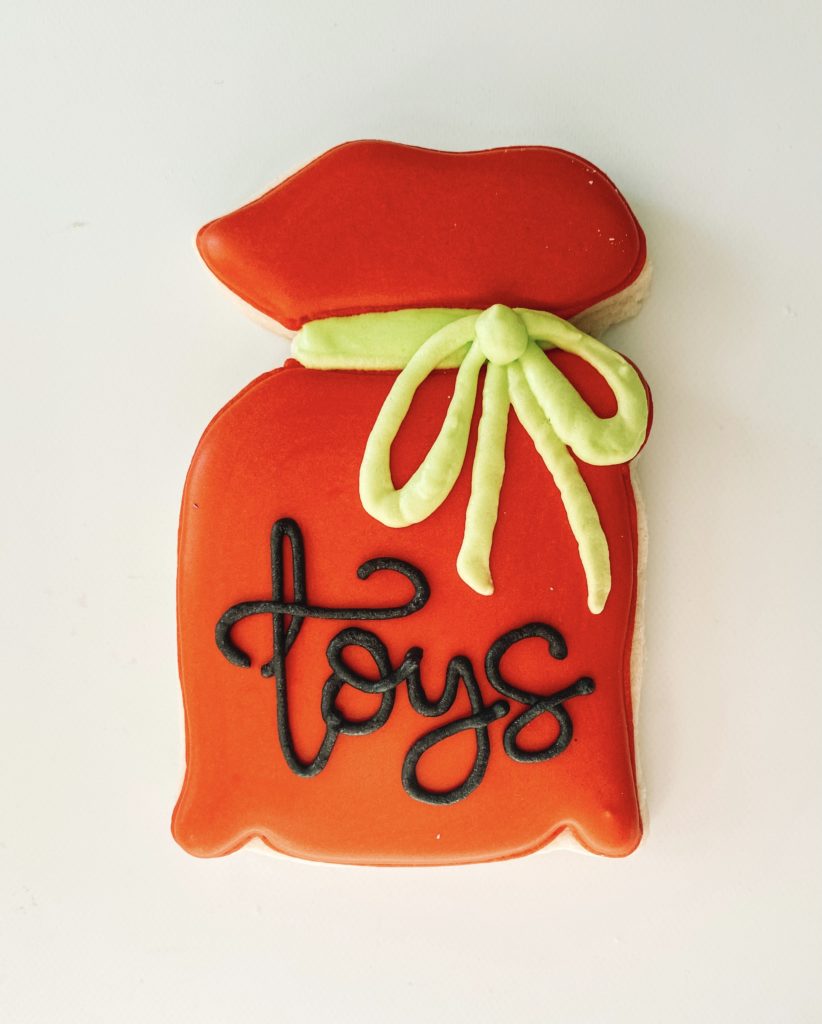
DETAILS
Step 3: Using lime green piping icing outline the blank section in the middle.
Step 4: Use lime green piping icing to make a bow with two loops and two tails.
Step 5: With black piping icing hand letter “toys” on the bag. I like to use a projector so I make sure my letters and spacing are correct. I recommend the pico pocket projector on amazon. Linked in my favorites.
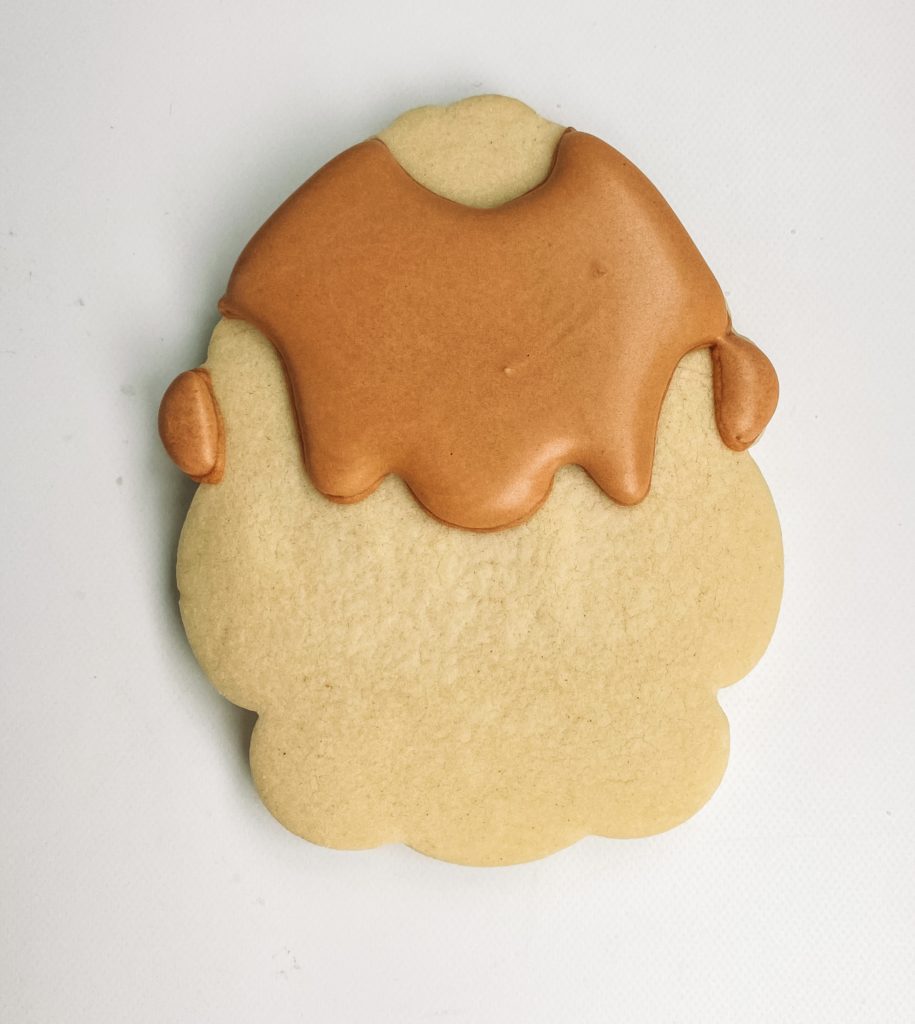
BALD SANTA COOKIE
OUTLINE and FLOODING
Step 1: Outline the face of the Santa clause and ears with skin tone piping icing (I use ivory for white, and warm brown for darker skin from cookie countess
Step 2: Using brown flood icing fill in the face of the Santa
Stop and allow your cookie to dry in front of a fan for 1-2 hours before moving on to the next section.
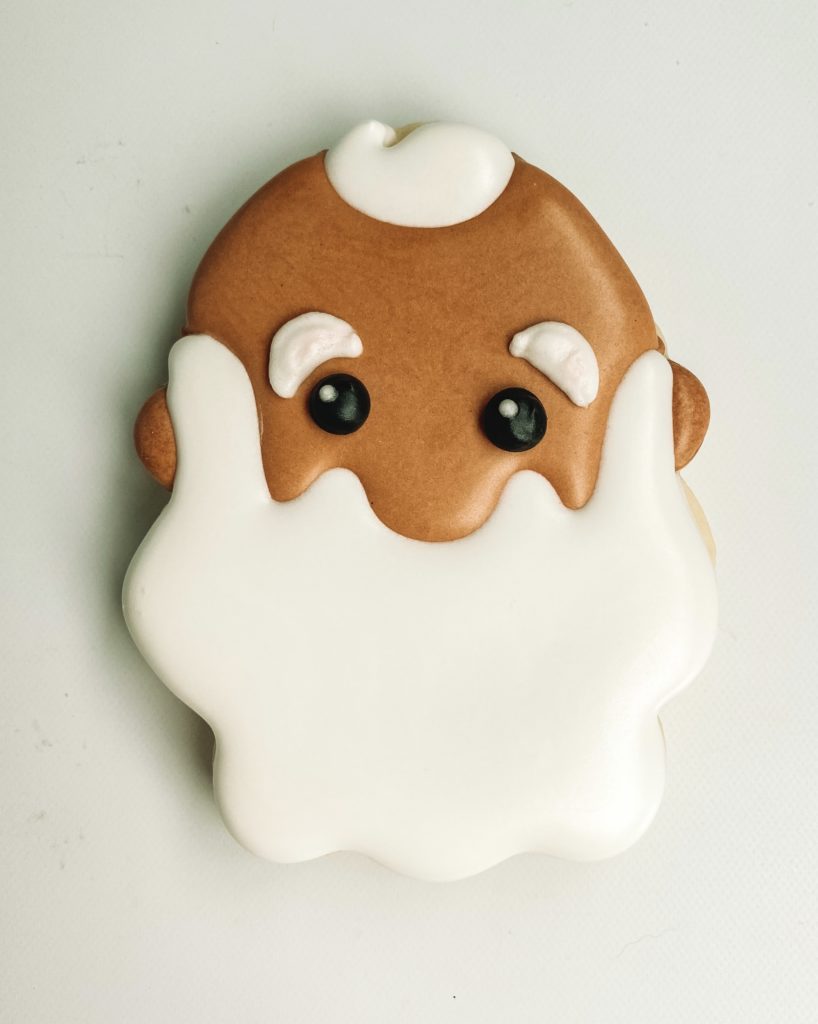
Step 3: Outline the beard, hair on the top of his head, and eyebrows with white piping icing. Add two eyes using black piping icing. I like to add 2 tiny dots of white piping icing to the middle of the eyes.
Step 4: Fill in the outlined sections with white flood icing.
DETAILS
Step 4: Outline each side of the mustache with white piping icing.
Step 5: Fill in the mustache with white flood icing.
Stop and allow your cookies to dry in front of a fan for 1 hour before finishing the rest of the cookie.
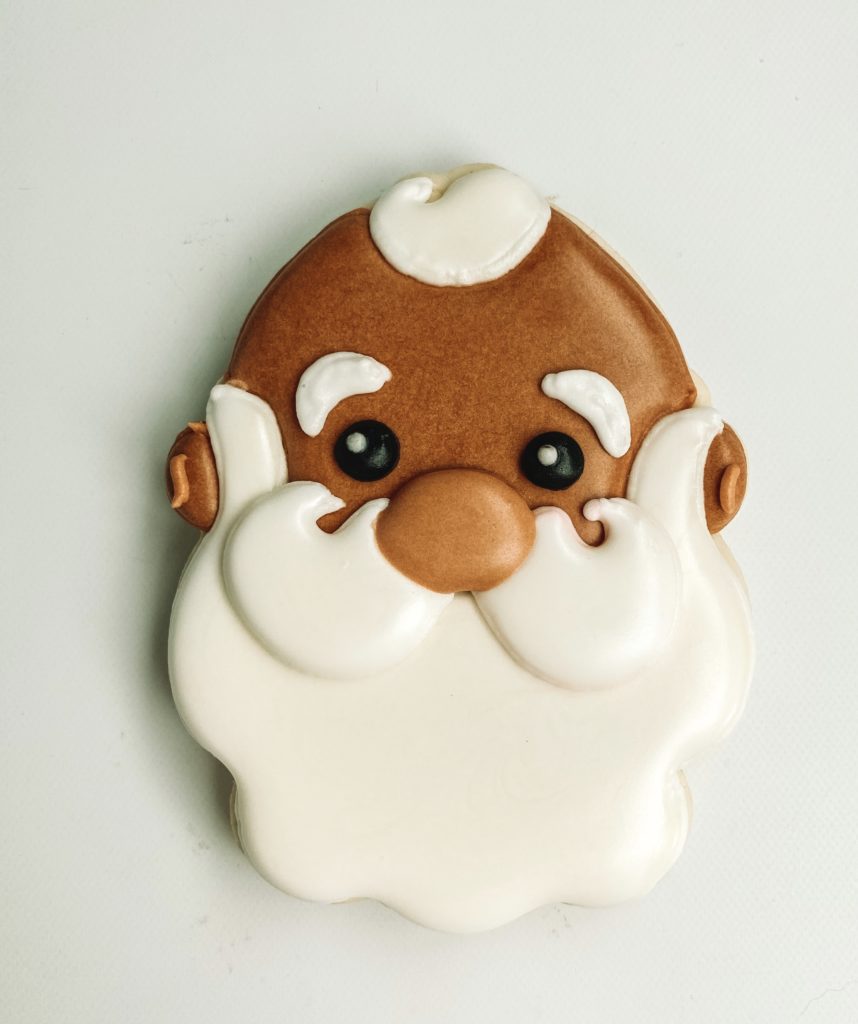
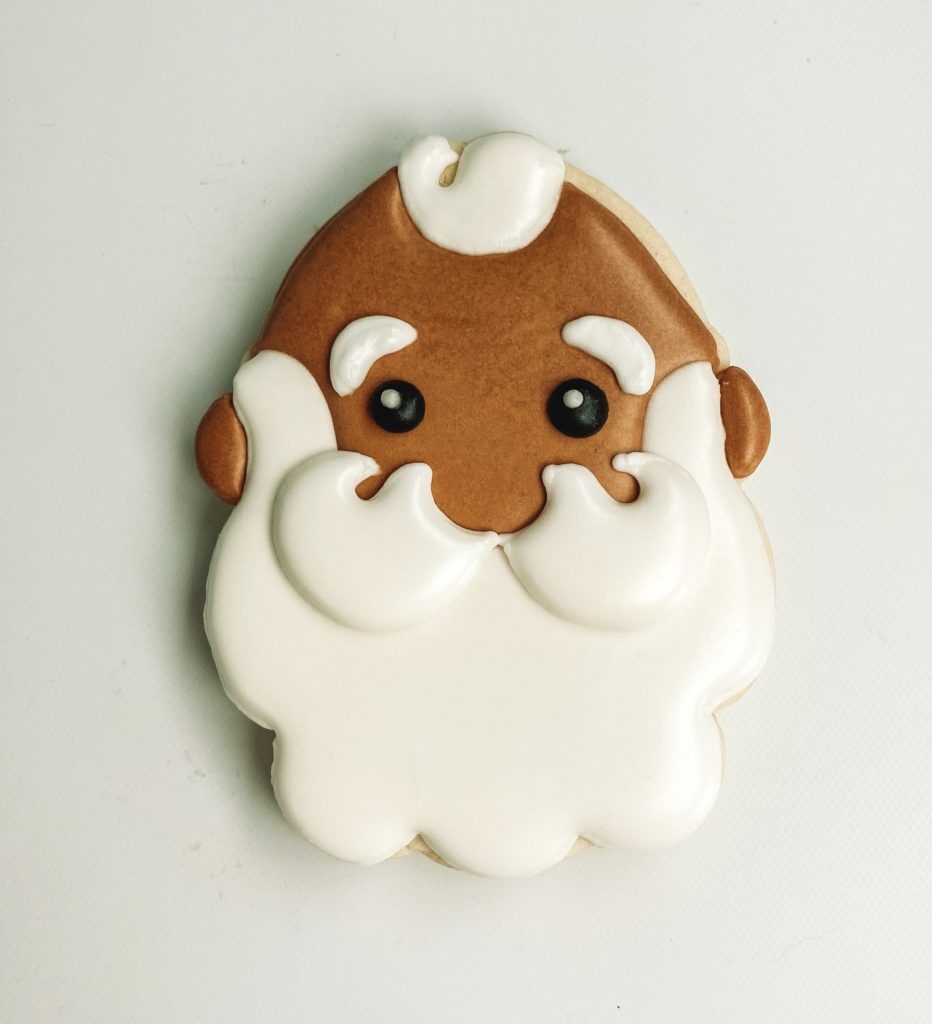
Step 6: Outline a nose with brown piping icing.
Step 7: Fill in with brown flood icing.
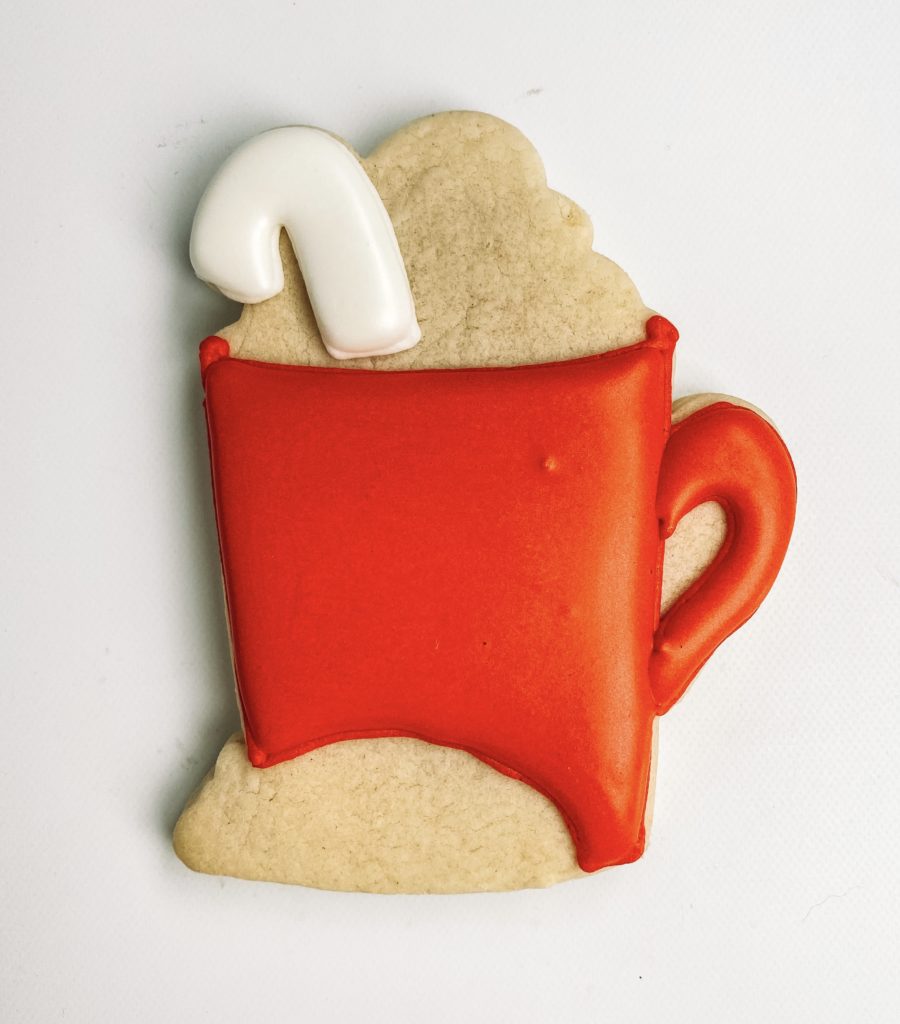
MUG AND COOKIE
OUTLINE and FLOODING
Step 1: Outline the mug in red piping icing. Outline the candy cane on the top in white piping icing.
Step 2: Fill the outline using red flood icing leaving the handle empty. Fill in the candy cane with white flood icing.
Stop and allow your cookie to dry in front of a fan for 1-2 hours before moving on to the details.
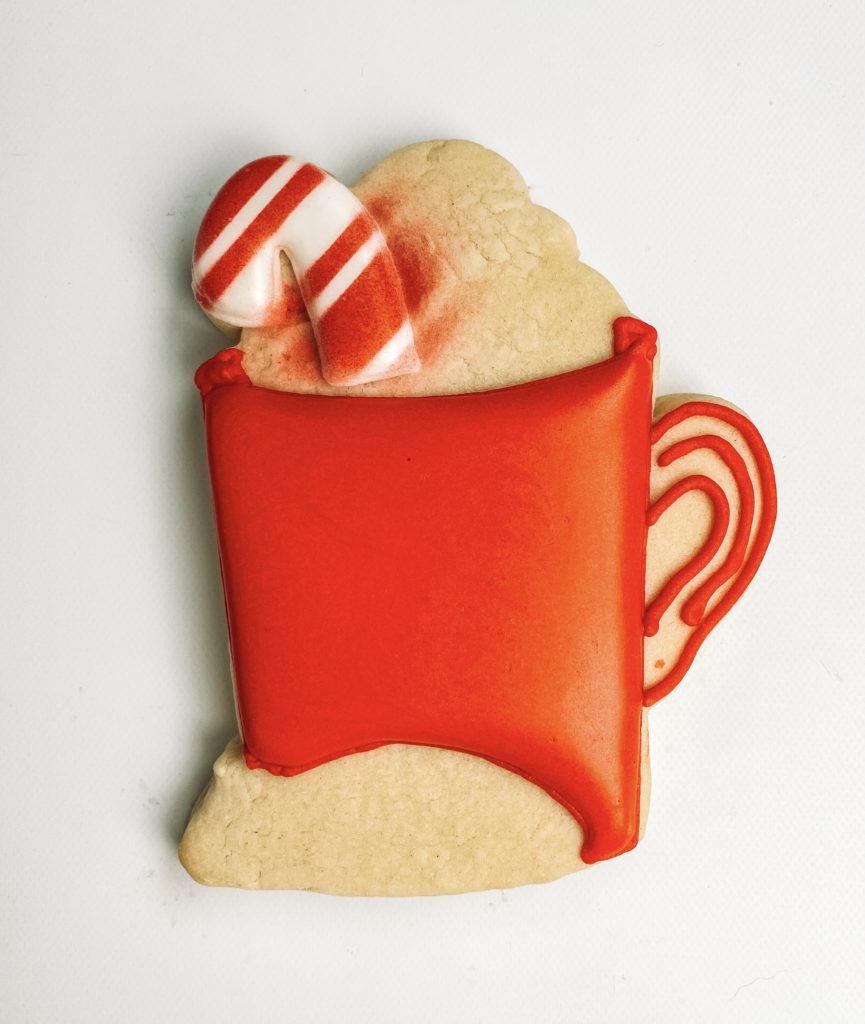
DETAILS
Step 3: Using a candy cane stencil (mine is from cookie countess) airbrush lines of the candy cane. Fill in the handle of the mug with red flood icing.
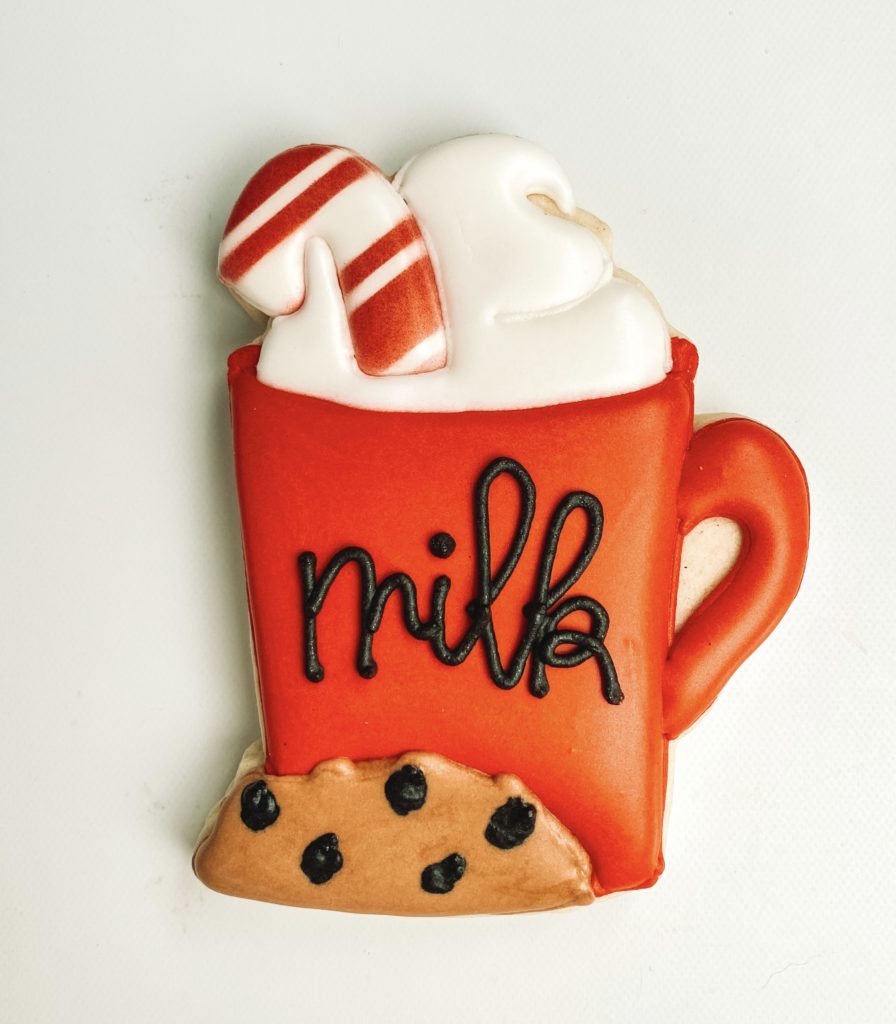
Step 4: Outline the cookie in brown piping icing. Outline the white cream on top in white piping icing.
Step 5: Fill in the cookie with brown flood icing while adding in “chocolate chips” using black piping icing. Fill in the whipped cream with white flood icing.
Step 6: Lastly, hand-letter “milk” in the center of the mug using black piping icing.
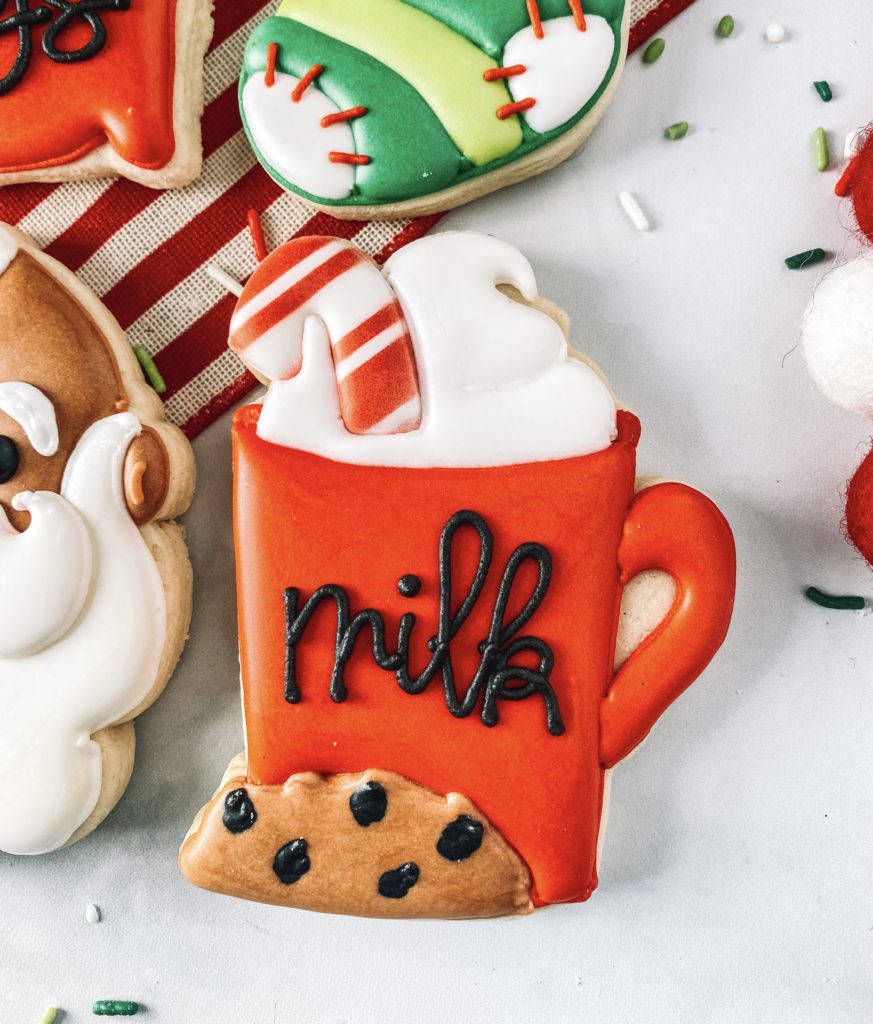
Your family will love this set of Christmas Cookies to put out for Santa on Christmas Eve, and Santa will have a tasty personalized treat to enjoy when he visits. I’m excited to see how your cookies turn out, take a few photos and share them on Instagram so I can see your Santa Christmas Cookie sets!